UNITY - Introduction to 3D Games  
This tutorial covers introductory topics on starting in Unity, 3D games, and Scripting.

INTRO TO UNITY
Part A: Unity Interface

Part B: Major Concepts
3D INTERACTIONS
Part 1. Project Set-Up
and Terrain
Part 2. Unity Physics
Part 3. Scripts & Audio
Part 4. Coroutines
Part 5. AddForce and
Projectile Shooting
FEEDBACK: VFX/ SFX
Part 6. Feedback FX
Changes on impact:
  Color
  Sound Pitch/ Volume
  Instantiate Particles
SCORES, SCENES, BUILDS
Part 7. UI and Scoring
Part 8. Debug Log
Part 9. Switch Scenes
Part 10. Timer
Part 11. Export Build

 
PART A: UNITY INTERFACE
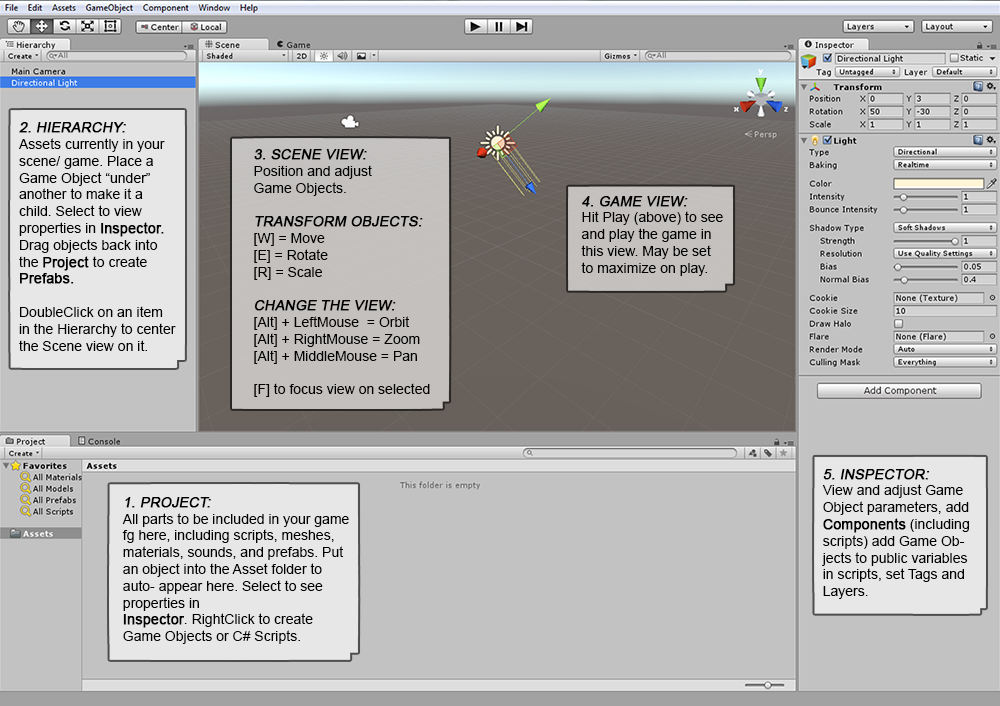
(1) PROJECT panel (bottom): Where all assets are stored. Shows the actual Project folders, auto-updates if anything is put into or taken out of folders outside or inside Unity. Only change contents of Assets folder. Make subfolders: prefabs, scripts, etc.

(2) HIERARCHY panel (far left): Contents of current scene. Organize by parenting similar objects under a named Empty GO, like putting all tree objects under an Empty G.O. called “foliage”.

(3) SCENE View (center): View and Transform all assets in the game from any desired angle.
  • NAVIGATE SCENE: Orbit = [Alt]+L-Mouse,
       Pan = [Alt]+M-Mouse, Zoom = [Alt]+R-Mouse.
  • TRANSFORM OBJECTS:
        move = [w], rotate = [e], scale = [r]
  • Hit [f] to zoom and frame selected (“focus”).
  • [Shift]+LeftClick to add or remove selection.

    (4) GAME View: See through camera. Multiple cameras can split screen by percentages. Hit Play to play game. NOTE: changes to assets during Play mode are reset when play is turned off (not saved).

    (5) INSPECTOR panel (far right): Shows all Components and parameters for G.O. selected in the Hierarchy (in Scene) or Project (Assest or Prefabs).

    Context gears/dots: Click gears or other context buttons to change parameters (like shapes or material Shaders) or add assets, like texture PNGs.

    (6) MENU: easy access to all parts of Unity. In particular, note:
  • File > Build Settings (to start any project)
  • Edit > Project Settings/Inputs for script-controlling inputs.
  • Assets > Import Package to get useful prefabs
  • GameObject (GO) and Component to build custom assets.
  • (7) CONSOLE panel: Check script errors.

    (8) Asset Store view: For downloading or uploading packages (note: for this course, all art and audio assets are expected to be made by your team).

    SCRIPTING NOTES:
  • Script Editor (IDE): Visual Studio (Unity 5.2 and above) Notepad++ (PC only), Atom (Mac only), etc.
  • Set your editor in Unity: Edit > Preferences > External Tools and choose the Script Editor at the top (on a Mac find Preferences under Unity menu).
  • Once assigned, open editor by DoubleClicking a script.
  • Write Unity scripts in C#.
  • Unity does not use one large block of code to manage the game; instead, each interactive object has one or more scripts to manage its behavior.
  • Scripts are Components added to GameObjects: [Add Component] > Script (C#) or RightClick Project panel Assets folder to Create > C# script and drag onto the object in the Hierarchy.
  • Scripts can access Components on their GameObject (play audio, change color or RigidBody Mass, etc).
  • Unity won’t play the game if a script has an error. This is good! See Console panel or footer for error messages to find the line with the problem and fix it.
  • Select a term you do not understand and hit [Ctrl/Cmd]+[‘] to access documentation.
  • Mathf = math functions collection, including clamp.
  • Unity has good physics engines built in (both 2D and 3D), complete with collision systems, raytracing, etc.

  •  
    PART B: MAJOR UNITY CONCEPTS / TERMS
    GAME OBJECT: The base of a thing in Unity. Just about everything in the game starts as an empty G.O., to which we add components to build it into an interactive asset.

    COMPONENT: everything we add to Game Objects to make them function as desired, including renderer, materials, particles, audio, physics, and custom scripts. Components can most easily be added to G.O.s and have their settings adjusted in the Inspector, with the G.O. selected.

    SCENE: a game “level”. A game can have many Scenes, each sharing or with their own G.O.s, Controllers, and Prefabs. File > New Scene for a new level or menu in the game, File > New Project to start an entirely new game.

    PREFAB: A container for a complete asset (collection of G.O., Components, settings) used repeatedly. Create by dragging an asset from Hierarchy to Project. Asset in Hierarchy turns blue, and each copy made from then on is an “instance” of the Prefab in the project. Prefabs can be Instantiated by code in a script (bullets, etc.). Can be exported in a Package to be used by others (like teammates).

    PACKAGE: Unity scenes do not merge well. Therefore, only one person can "own" (modify) the Unity Scene at a time, and collaborators must work in temporary Scenes and then Package up the content they want to send to the Scene Owner for integration into the actual scene. The steps:
    (1) Create an Empty GameObject in the Hierarchy.
    (2) Parent all Hierarchy elements to be packaged under that Empty GO.
    (3) Name the Empty GO usefully.
    (4) Drag the Empty GO parent to the Project to make a Prefab of the entire group.
    (5) Rightclick to Export Package, and share with team

    2D vs 3D: a 3D Unity game works with perspective and a 2D game uses flat parallax planes. Each must use their own physics prefabs, for example “RigidBody” for 3D and “2DrigidBody” for 2D. Set the initial game system to 2D or 3D on project creation.
    PHYSICS: in Unity there are a number of Physics and Physics2D Components to manage physical interactions. Colliders (capsule, mesh, or box) manage object interactions and can be set for physics interactions (bouncing) or to trigger other effects (like activating a script if set to isTrigger). RigidBody enables the built-in physics engine, is applied to any object with actively interacting colliders (any object with a collider that is not the ground), and contains gravity which can be turned off for flying/space games. Physic Materials can be added to colliders to control friction and bounciness.

    CONTROLLER: a component meant to manage a major game part. We write a custom GameController for a Scene and add AnimationController to animated assets to manage interaction of that asset’s animations with its scripts.

    GUITEXT are empty G.O. with GUIText components applied. They are differently visible in Game view (overlays game) and Scene (HUGE). Uses pixels in viewport space. Position by default is relative to: lowerLeft 0/0/0, upperLeft 1/0/0, upperRight 1/1/0, lowerRight 0/1/0.

    TAGS are identifiers which can be added to a GameObject in the Inspector for scripts to exclude or include from an effect, or to find a unique tagged G.O., like the Player or GameController (or a custom tag). LAYERS are for identifying groups of objects, and are accessed by Layer # (int) rather than Tag name (string).

    AUDIO in Unity comes in 3 main forms:
  • Audio Clips = Sound files: WAV or MP3 work well. See Inspector for import settings/ preview. Flat: Turn off 3D Sound.
  • Audio Sources = G.O. with audio component to play SFX or music, added by dragging audio clip on G.O. Note “Play on Awake” and “Loop” settings to decide if audio starts immediately as G.O. is created and if it plays continuously. Also note volume settings.
  • Audio Listener = What the audience hears. By default this is on the Main Camera, the single G.O. that receives audio. If 3D sound is on, distance of Sources from Listener changes audio volume.


  •  UNITY 3D TUTORIAL: Intro to Physics,
    First-Person Controller, and Scripting Interactions

    UNITY SHORTCUTS:
      Doubleclick an item in Hierarchy to center it (or select an object, hover over Scene, hit [f]).
      [alt / option] + mouse buttons to navigate in the Scene window.
      Transform an object: [w] = Move, [e] = Rotate, [r] = Scale

    PART 1: SET-UP
    a). Create a new 3D Project in Unity:
          Open the Unity Hub.
          Hit [New]. In the window that opens, choose 3D, set the name and location (all names for projects and assets should avoid spaces or special characters. Use HumpCap notation). Hit [Create] and wait for the project to build into the location you set.

    b) Download the following assets and add them to the Project Panel > Assets folder:
      This First Person Controller (RightClick in Assets folder to Import Package).
      These 3 Sound FX files (open .ZIP, drag MP3s to desktop, then into Assest folder).

    3D TERRAIN:
    Want to try a more natural-looking environment?

    Try this short tutorial on using the Unity Terrain system for sculpting landscape, texturing the surface, adding foliage.

     PART 2: INTRODUCTION TO UNITY OBJECTS AND PHYSICS
    1. Create the ground:
    a). Game Object menu > 3D > Cube.
    See it in both the Hierarchy (left column) and Scene view (big center space).

    b). In the Hierarchy select the Cube to see properties in the Inspector panel (right column).
          At the top of the Inspector, change the name to "Ground."
          Under Transforms, Set Position X, Y, Z = 0. Set Scale X & Z = 20 and Y (height) = 0.1.
    NOTE: In the Inspector, any rolldowns below Transforms are Componets assigned to the Game Object (G.O.). Any script we add to a Game Object is also a Component.


    2. Navigate in 3D space:
    a).
    With the Cube selected, hover the mouse over the Scene view and hit [f] to center the view on the selected Cube.

    b). To adjust the view, hold [Alt / Option] and ClickDrag the mouse buttons:
    [Alt]+LeftMouse=orbit       [Alt]+RightMouse=zoom       [Alt]+MiddleMouse=pan


    3. Add a second cube to play with Physics:
    a).
    Create another Game Object menu > 3D > Cube.

    b). Hit [w] to move it up, high above the Ground.

    c). In the Inspector: name it "DropCube", then at bottom click [Add Component].
    Under Physics (NOT Physics2d) find and add RigidBody (this adds gravity effects).

    d). Select the Camera and Transform it ([e] to rotate, [w] to move) to frame (look at) both the DropCube and the Ground.

    e). Hit Play to watch the DropCube drop.
    Any changes while in "Play" mode are not saved, so we can go to the Scene window and lift the Cube to see the default physics engine continue to effect it. Turn off Play to resume editing.

    f). Create Bounciness:
          In the Project panel Assets folder RightClick to create a Physic Material.
          In the Inspector change the bounce from 0 to 1 (100%).
          Drag the Physic Material onto the DropCube in the Hierarchy or the Scene.
          Hit Play to watch the cube fall and bounce. Turn off Play to resume editing.

     PART 3: INTRO TO SCRIPTING AND AUDIO FOR 3D
    See these Scripting Notes, above.

    1. Create a game Pickup:
    a). Create a third GameObject > 3D Object > Cube. In the Inspector name it "SpinCube"

    b). Add a Material to change the color:
          In Project panel Assets folder, RightClick to create a folder called "Materials".
          Inside the folder RightClick to make a material, name it "SpinCube_m".
          In the Inspector, set the Albedo rectangle to a bright color.
          Drag the Material onto SpinCube in the Hierarchy to see the color on the cube in Scene.

    c). Add Physics:
          Select the Spincube. In Inspector, Add Component > Physics > RigidBody.
          Under RigidBody Turn off "Use Gravity".
          Find the default Box Collider component on Spincube, turn on “IsTrigger”.


    2. Create a new C# Script:
    a)
    In Project panel Assets folder: RightClick to Create > C# Script, name it “Rotator,” hit [Enter] to commit the name (adds the name to both the file and the Class).

    b) Double-click the script in the Project to open it in your editor.

    c) “void Start ()” and “void Update ()” are default functions. Delete Start(), be sure class name is Rotator, add 1 line to Update() (see below).

    d) Save the script [Ctrl / Cmd] + [s]. Click back to Unity and wait as the script loads.
    Rotator.cs:
    using System.Collections;
    using System.Collections.Generic;
    using UnityEngine;

    public class
    Rotator : MonoBehaviour {

        void Update () {
            transform.Rotate (new Vector3 (15, 30, 45) * Time.deltaTime);
        }

    }

    e). Drag the script onto SpinCube in Hierarchy. Hit Play to see rotation. Turn off Play.

    f). Drag the SpinCube into the Project Assets folder to create a Prefab (an instance).

    g). Select SpinCube in Hierarchy, hit [Ctrl/Cmd]+[d] to duplicate for 3 cubes, move in the Scene.


    3. Add Player Interaction: Make Cube Disappear
    a).
    Drag the FPSController prefab from the Assets folder to the Hierarchy.

    b). With the FPSController selected, [Add Component] Physics > Capsule Collider.
    Turn on “isTrigger”. Move Center forward on Z (try 2.0). At top set Tag to “Player”.

    c). Add an OnTriggerEnter function to the Rotator script (put before Class end-bracket). Note the condition: if an object with this script is impacted by a collider that is on an object with the tag "player", do the command:
    Add to Rotator.cs (new content is bold-faced):
    using System.Collections;
    using System.Collections.Generic;
    using UnityEngine;

    public class
    Rotator : MonoBehaviour {
         void Update () {
                transform.Rotate (new Vector3 (15, 30, 45) * Time.deltaTime);
         }

         void OnTriggerEnter(Collider other){
                 if (other.gameObject.tag == "Player") {
                     gameObject.SetActive(false);
                 }
          }

    }

    d). Hit Play to test: use [WASD] to approach the Spincube. When the player touches the it, the Spincube should disappear (if it does not, make sure the tag "Player" was set on the FPSController). Turn off Play to reset the Scene.

    CURSOR NOTE: If you want the Cursor to not disappear when using the FPS controller, select the FPS object and in the Inspector turn OFF:
    First Person Controller > Mouse Look > Lock Cursor.


    4. Player Interaction: Cube Makes a Sound
    a). Drag each sound effect file from the Assets folder onto a SpinCube in the Hierarchy (oen each). This automatically adds an "Audio Source" component to the Objects.
    In the Inspector, turn off "Play on Awake" in each Audio Source.

    b). Change the OnTriggerEnter code to comment-out the SetActive(false) line (type // at the start of that line) and add a new command to play the AudioSource component:
    Add to Rotator.cs (in the OnTriggerEnter function):
       void OnTriggerEnter(Collider other) {
                if (other.gameObject.tag == "Player") {
                      //gameObject.SetActive(false);

                      GetComponent<AudioSource>().Play();

                 }
       }

    Hit Play and move the Player to collide with each Cube to make all 3 sounds.


    FIX DOUBLING:
    Is the audio playing twice, and the score (see later notes) registering two hits per cube?
    The reason is the FPS controller has a Collider in its Prefab in addition to the Capsule Collider we added, and both can hit the Cube Collider!

    A solutuon is to turn off the Cube Collider after it registers first Player impact:
    Add the bold-faced line to OnTriggerEnter above GetComponent<AudioSource>().Play():

    Add to Rotator.cs (in the OnTriggerEnter function):
           void OnTriggerEnter(Collider other) {
                  if (other.gameObject.tag == "Player") {
                         //gameObject.SetActive(false);
                         GetComponent<Collider> ().enabled = false;
                         GetComponent<AudioSource>().Play();
                  }
         }


     PART 4: Use COROUTINES to add a delay between sound and destruction:
    To BOTH make a sound and make the object disappear, we need a delay (so the audio plays for more than a single frame).
    a). To create a delay: Add a separate "Co-routine" IEnumerator function that returns the delay and then destroys the game object:
    Add to Rotator.cs:
    public class Rotator : MonoBehaviour {
           void Update () {
                 transform.Rotate (new Vector3 (15, 30, 45) * Time.deltaTime);
           }

           void OnTriggerEnter(Collider other){
                 if (other.gameObject.tag == "Player") {
                       GetComponent<Collider> ().enabled = false;
                       GetComponent<AudioSource>().Play();
                       StartCoroutine(DestroyThis()); // call the new co-routine
                 }
           }
           // the co-routine allows the yield delay command
           IEnumerator DestroyThis(){
                 yield return new WaitForSeconds(0.5f);
                 Destroy(gameObject);
           }
    }

    b). Save the script, click on Unity to load, hit Play to test.
    Any SpinCubes touched by the player should make their sound and disappear.

     PART 5: ADDFORCE:
    As we saw with AudioSource, Unity variables can hold references to other Components of the Scripted-Object. Here is another example:

    a). Create a third GameObject > 3D Object > Cube.
    b). In the Inspector name it "ZoomCube."
    c). [Add Component] > Physics > Rigidbody to it. Turn off "Use Gravity".
    d). Create a new C# script called "Zoooom" and apply to the Cube.
    e). Open the script in your editor, add this code, Save and Play to watch the motion:
    Zoooom.cs
    using System.Collections;
    using System.Collections.Generic;
    using UnityEngine;

    public class Zoooom : MonoBehaviour {

           public
    float thrust = 100f;
           private
    Rigidbody rb;

           void Start () {
                 rb = GetComponent<Rigidbody>();
           }

           void FixedUpdate() {
                 rb.AddForce(transform.forward * thrust);
           }
    }

    We can also make an object move from its current location to a target location using LERP (Linear Interpolation). Look through this excellent LERP Tutorial


    SHOOTING PROJECTILES:
    Want to shoot objects in the environment?

    Go here to add projectile shooting to your
    Standard Assets FPS Controller.


     PART 6: PLAYER FEEDBACK WITH VISUAL FX AND SOUND FX

    COLLISION EFFECTS: There are many ways to emphasize an impact or action and let the player know something happened. Here are three ways to communicate information to the player in-game: change the object color, play a sound, create a particle effect.
    Each script pays attention to the "magnitude" of the impact velocity (how much force is involved), so that initial / big impacts generate results but final / smaller bounces do not.

    a). Create a new GameObject > 3D > Cube, name it "FunCube".
            [Add Component] Physics > Rigidbody.
            Hit [w] to move the cube up so it falls a distance to the Ground when we Play.

    b). At the top of the Inpsector create a new Layer called "stuff" (Layer 8).
    Set the Ground Cube and FunCube to this layer.

    c). RightClick the Project panel Assets folder to create a Physic Material.
            Inspector: Set bounciness to 2 and both frictions to 0.2.
            Drag the Physic Material into the FunCube Collider slot.

     
    d). ADD VFX #1: Color Changes
            Create the script FunCubeColor.cs and add it to FunCube. Playtest!
    This script has:
  • A variable to track the number of times the object has collided with others.
  • 3 variables for the 3 values that define digital color (red, green, blue, each from 0 - 1).
  • A condition to only count collisions over a certian magnitude, so lighter collisions will not change the color.
  • Random.Range commands to select values for each color variable at each impact (with a change from cool to warm colors after a certain number of hits).
  • Access to the object Renderer to set the color of the object Material to the new values.
    FunCubeColor.cs
    using System.Collections;
    using System.Collections.Generic;
    using UnityEngine;

    public class FunCubeColor : MonoBehaviour {

           private float hits = 0;     //the # of this object's collisions
           private float r ;               // red color, 0-1
           private float g ;              // green color, 0-1
           private float b ;              // blue color, 0-1

           void OnCollisionEnter(Collision other){
                  //if the impact has enough force
                  if (other.relativeVelocity.magnitude > 5) {
                        //increment hits #
                         hits += 1;
                        //randomize RGB color values, but go from warm to cool
                         if (hits <= 4) {
                               r = Random.Range (0.3f, 1f);
                               g = Random.Range (0.1f, 0.5f);
                               b = Random.Range (0f, 0.2f);
                         }
                         if (hits > 4) {
                               r = Random.Range (0f, 0.3f);
                               g = Random.Range (0f, 0.3f);
                               b = Random.Range (0.3f, 1f);
                        }

                        Renderer cubeRenderer = GetComponent<Renderer>();
                        cubeRenderer.material.color = new Color(r,g,b);
                  }
           }
    }

     
    e). ADD SFX: Sound Changes:
            Download this sound file (piano middle C).
            Drag the sound file into the Assets folder to add it to the Project.
            Drag the file onto FunCube in the Hierarchy to add it as an AudioSource component.
            Select FunCube, and in the Inspector: Turn off Play on Awake, set Volume = 0.5.
            Create the script FunCubeSound.cs and add it to FunCube. Playtest!

    This script has:
  • A variable to track of the number of times the object has collided with others.
  • A variable for the Audio Source component, a variable to hold the initial Pitch, and variables to hold changes to the Pitch and Volume.
  • An Awake() function to populate these variables.
  • A Collision function to set these values based on the numbe of hits, to achieve a Shepard Scale (moving pitch progressively upward or downward, in this case downward).
  • Sets the AudioSource component Pitch and Volume to the new values.
    FunCubeSound.cs (sound file needs to be on cube)
    using System.Collections;
    using System.Collections.Generic;
    using UnityEngine;

    public class
    FunCubeSound : MonoBehaviour {

           private float hits = 0;
           private AudioSource audioClip;    //the actual AudioSource
           private float clipStartPitch;               //the original note
           private float clipPitch;                       //a modified note
           private float clipVolume;                   //hold and modify the volume

           void Awake() {
                 //populate the variables
                 audioClip = GetComponent<AudioSource>();
                 clipStartPitch = audioClip.pitch;
                 clipPitch = audioClip.pitch;
                 clipVolume = audioClip.volume;
           }

           void OnCollisionEnter(Collision other){
                  //if the impact has enough force, play audio
                  if (other.relativeVelocity.magnitude > 5) {
                        audioClip.Play();
                        //increment hits #
                        hits += 1;
                        //if pitch is above 0, lower pitch per hits, lower volume
                        if (clipPitch > 0){
                               clipPitch = (clipStartPitch - (hits/10)); //lower pitch
                               audioClip.pitch = clipPitch;                 //assign to clip
                               audioClip.volume = clipVolume / 2;
                        }
                 }
           }
    }


    f). ADD VFX#2: Particle Effects:
    1. Create Smoke Material:
          Download this smoke texture, drag into Project.
          RightClick the Project panel Assets folder to create
               a new Material, name it "ParticleSmoke".
          Hit Albedo hotspot and choose ParticleSmokeSmall.png.
          Set Material Shader to Particles > Alpha Blended.

    2. Create the Particle System:
          Create a new GameObject > Effect > ParticleSystem.
          Apply these SETTINGS (click image to right for larger):
              RENDERER (bottom): Set Material to ParticleSmoke Material.
              MAIN (top): Duration = 3, Turn off Looping, Start Lifetime = 2,
               Start Speed = 0, Start Size = 1.
              EMISSION: Rate Over Time = 0, add a Burst [+].
              SHAPE: Shape = Donut.
              VELOCITY OVER LIFETIME: Turn on. Set Radial = 0.5.
              COLOR OVER LIFETIME: Turn on. Click white rectangle to open
              color and opacity bar. Set bottom tabs (color) to brown and black.
              Set top left tab to Alpha=0. Move left-side tabs to Location = 50%.


    3. Make a Prefab:
          Drag the Particle Effect to the Project panel to make a Prefab.
          Delete the Particle Effect from the Hierarchy.

    4. Create a script for the Funcube to use this Particle System:
          Create the script FunCubeParticles.cs and add it to FunCube.
          Add the Particle Prefab to the script slot. Playtest!
    This script has:
  • A variable for a ParticleSystem GameObject and a Vector3 variable to hold a particular location in 3D space (x, y, and z coordinates).
  • A Collision function that populates the Vector3 with the point of contact in the Collision, and then "Instantiates" (creates) a copy of the ParticleSystem at that point of contact (if the impact exceeds the magnitue minimum).
    FunCubeParticles.cs (drag Particles Prefab into script slot)
    using System.Collections;
    using System.Collections.Generic;
    using UnityEngine;

    public class FunCubeParticles : MonoBehaviour{

           public ParticleSystem impactParticles;
           public Vector3 SpawnParticlesHere;

           void OnCollisionEnter(Collision other){
                  //if the impact has enough force
                  if (other.relativeVelocity.magnitude > 5) {
                         //get impact location
                         SpawnParticlesHere = other.contacts[0].point;
                         //make particles at that location
                         Instantiate (impactParticles, SpawnParticlesHere, other.transform.rotation);
                  }
           }
    }


    5. Add Efficiency:
    The above script does not remove the Particle Systems (PS) after they have completed, so you will still see the "shuriken" icon in the Scene view during Play mode.
    This is not performant (can cause slow-down in a game).
          To remove them, make these changes to the script:
             #1 Create a GameObject variable to hold the current instantiated PS.
             #2 Set the Instantiate line to fill this GO variable.

             #3 Call a Co-routine (IEnumerator) to remove the current PS.
             #4 In the IEnumerator, set a delay long enough for the PS to finish, then destroy it.
    Add to FunCubeParticles.cs to make it more efficient
    using System.Collections;
    using System.Collections.Generic;
    using UnityEngine;

    public class FunCubeParticles : MonoBehaviour{

           public GameObject impactParticles;
           public Vector3 SpawnParticlesHere;
           public GameObject newParticles;                            //#1

           void OnCollisionEnter(Collision other){
                  //if the impact has enough force
                  if (other.relativeVelocity.magnitude > 5) {
                         //get impact location
                         SpawnParticlesHere = other.contacts[0].point;
                         //make particles at that location
                         newParticles = Instantiate (impactParticles, SpawnParticlesHere, other.transform.rotation);                                                             //#2
                         StartCoroutine(DestroyPS(newParticles));   //#3
                  }
           }

           IEnumerator DestroyPS(GameObject newPS){         //#4
                 yield return new WaitForSeconds(3.0f);
                 Destroy(newPS);
                 }

    }

    g). Increase Gravity for faster falls / more VFX:
    Open Edit > Project Settings > Physics to increase gravity from the default 9.8 meters per second. Try setting it to a much higher number, like 50.


  •  PART 7: UI AND SCORING:
    Another way to give players feedback on their progress is through HUD displays.
    To show a score we need two new things: A Game Object containing a public Control script for managing the scorekeeping, and a UI Text Object to display the score (on a Canvas).

    A). Create an Empty G.O.: GameObject > CreateEmpty, name "GameControlObj".
    In the Inspector apply the tag GameController.

    Create a new C# script named GameController.cs. Drag this script onto GameControlObj.
    Doubleclick the script to open in your editor.
    IMPORTANT: Be sure to add the UI namespace to the top!:

    GameController.cs:
    using System.Collections;
    using System.Collections.Generic;
    using UnityEngine;
    using UnityEngine.UI;

    public class
    GameController : MonoBehaviour {
           public GameObject textGameObject;
           private int score;

           void Start () {
                score = 0;
                UpdateScore();
                 }

           public void AddScore (int newScoreValue) {
                 score += newScoreValue;
                 UpdateScore ();
                 }

           void UpdateScore () {
                 Text scoreTextB = textGameObject.GetComponent<Text>();
                  scoreTextB.text = "Score: " + score;
                 }
             }


    B). Create a Canvas Text object, add it to the GameControllerObj script:
      GameObject menu> UI > Text to make a Text Object inside a Canvas Object.
    (NOTE: The Canvas appears normal in the Game view and crazy large in the Scene view).
      With the Text Object selected, change these settings in the Inspector:
          Set Width and Height much larger to increase text field (double or more).
          Set Pos X and Pos Y to a corner of Game view.
          Change text field to "Score".
      Add the Text object to the GameControllerObj script slot:
          In the Hierarchy select your GameControlObj.
          In the Inspector find the GameController script component with the empty, public TextGameObject script slot.
          Fast-drag the Text object from the Hierarchy into the TextGameObject script slot.

    C). Finally add 3 parts to the Rotator.cs script so collected objects can update the score:
           #1. Add a private variable to hold the GameController object.
           #2. Add a Start method to find the actual GameController object and assign it to the private variable (first assign to a temporary GameObjectTemp variable).
           #3. Add a line to the OnTriggerEnter function to run the AddScore function inside of GameController's script:

    Add to Rotator.cs:
    using System.Collections;
    using System.Collections.Generic;
    using UnityEngine;

    public class
    Rotator : MonoBehaviour {

           private GameController gameController; // #1: add variable to hold GameController

           void Start () {                                           // #2: assign actual Game Controller to variable
              if (GameObject.FindWithTag ("GameController") != null) { gameController = GameObject.FindWithTag ("GameController").GetComponent<GameController>();
             }
          }


           void Update () {
                 transform.Rotate (new Vector3 (15, 30, 45) * Time.deltaTime);
           }

           void OnTriggerEnter(Collider other){
                 if (other.gameObject.tag == "Player") {
                       GetComponent<Collider>().enabled = false;
                       GetComponent<AudioSource>().Play();
                       gameController.AddScore (1);         // #3: update score through AddScore()
                       StartCoroutine(DestroyThis());
                 }
           }

           IEnumerator DestroyThis(){
                 yield return new WaitForSeconds(0.5f);
                 Destroy(gameObject);
           }
    }


     PART 8: ADDING DEBUG.LOG
    Not sure why a certain behavior is occurring? Add a “return” to the debug log!

    For example, to the updated Rotator.cs script, in the OnTriggerEnter function, you can add this to see how many times the collider is activated:
       Debug.Log ("impact: " + scoreValue);

    Hit Play and open the Console Panel (next to the Project Panel ) to view the log.

     PART 9: SWITCH BETWEEN LEVELS:
    Let's say we want to go to a new level when this level is complete.

    a). If you have not already done, so, drag the GameController object from the Hierarchy into the Assets folder to make it a Prefab.

    b). Save this Game Scene, name it "GameScene".

    c). Open and revise GameController.cs script:
    Add an Update() function to allow [Esc]-quitting the game.
    Add a new Namespace for SceneManagement, variable and content to the AddScore() function for the win state, and new functions for Update(), PlayAgain() and QuitGame().

    Also, add a new class bool "isEnd" and a condition to the Start() function to make the Cursor visible and functional in End Scenes (needed after the First Person Controller disables it in the Game Scene).
     Add to GameController.cs:
    using UnityEngine;
    using System.Collections;
    using UnityEngine.UI;
    using UnityEngine.SceneManagement;

    public class
    GameController : MonoBehaviour {
         public GameObject textGameObject;
         private int score;
         public int scoreWin = 3;
         public bool isEnd = true;      // allows specifioc settings for the end scenes

         void Start () {
              score =0;
              UpdateScore ();

              if (isEnd){
                   Cursor.lockState = CursorLockMode.None;
                   Cursor.visible = true;
              }

         }

        void Update () {     // always include a way to quit the game:
               if (Input.GetKey("escape")) {
                     QuitGame();
              }
        }


        public void AddScore (int newScoreValue) {
              score += newScoreValue;
              UpdateScore ();
               if (score >= scoreWin){
                  SceneManager.LoadScene("EndWin");
    // uses level name
                 //SceneManager.LoadScene(1);
    // uses build index
                 //SceneManager.LoadScene (SceneManager.GetActiveScene().buildIndex);
                                                                         
    // restart same level
                }
         }

        void UpdateScore () {
               Text scoreTextB = textGameObject.GetComponent<Text>();
                scoreTextB.text = "Score: " + score;
         }

        public void PlayAgain() {
            SceneManager.LoadScene("GameScene");
            theTimer = startTime;
            score = 3;
        }


        public void QuitGame() {
            #if UNITY_EDITOR
                UnityEditor.EditorApplication.isPlaying = false;
            #else
                Application.Quit();
            #endif
        }

    }

    NOTE the options for using the Scene index, the Scene name, or just restarting the same level.
    To delay the switch to the next level, add another Co-routine (IEnumerator) with a delay.


    d) In the GameScene select the GameController to set the "isEnd" bool = off, so the cursor will remain under the control of the First Person Controller and in the next section the countdown timer will end the game.

    e). Create a new Scene, save and name it "EndWin".

    f). Add a new GameObject > UI > Text.
    Select the Canvas object that is created, set the Canvas Scaler > UI Screen Mode = Scale with Screen Size, and the Reference Rsolution size to x = 1280 and y = 720

    Select the Text object. In the Inpector name it "textWin". Set the Rect Size big (800 x 100), center it and lift to middle=-top. Set the Font Size big (70, bold), align = center, set the color bright, and change the text field to "You Win!!"

    g). Add a new GameObject > UI > Button.
    In the Inpector name it "Button_PlayAgain". Set size = 300 x 80 and set desired colors for Normal and Highlighted.

    Open the twirly to select the Button's child Text object. Set font size = 50 and bold, the color high-contrast, and change the text to "PLAY AGAIN".

    Add Functionality: Re-select the Button.
    At the bottom of the Inspector, find "OnClick()" and hit the [+] to add an event.
    Drag the GameController object from the Hierarchy (NOT the Assets folder) into the "None" slot (beneath "Runtime Only").
    Then click "No Function" (on the right) and choose GameController > PlayAgain().

    h). Duplicate the Button, drag it lower in the Canvas.
    In the Inpector rename it "Button_QUIT".
    Open the twirly and select the Text object to change the field to say "QUIT GAME".
    Re-select Button, under OnClick change "PlayAgain()" to GameController > QuitGame().

    i). Save the Scene as "EndWin".
    Make a duplicate of the Scene: File > Save As, name it "EndLose".
    Change the Text in End Lose from "You Win!" To "You lost".

    j). Go to File > Build Settings and add the Scenes: drag the Scenes from the Project panel > Assets folder to this window, first Level1 (so it gets index 0) and then Level2 (index 1).

      PART 10: MAKE A TIMER:
    Finally, ADD STAKES to your game by creating a time limit. A countdown timer can go to a second Scene with a "lose" message in the Canvas Text.

    a). Create the Timer Display:
    Select the existing Canvas in the Hierarchy, make a new GameObject menu > UI > Text.
    In the Inspector name it "TimerText", set PosX and PosY to the opposite corner from the Score text, set the Width and Height a bit bigger and add default text to the Text Field: 00

    b). Revise the GameController.cs script to include:
  • Three new variables: float theTimer, Text object to reference, bool isEnd.
  • A line in the Start() function to set the initial time, in seconds.
  • A FixedUpdate() function to decrement the time based on Time.deltaTime.

    Add to GameController.cs:
    Two variables at the top of the Class, with the other Class variables

           public float theTimer;            // add a timer variable
           public Text timerText;
              // add a reference to a new UI Text object
           public float startTime = 20;

    One new line in the Start() function:
           void Start () {
                score =0;
                UpdateScore ();
                theTimer = startTime;           // set timer to 20 seconds
                if (isEnd){
                   Cursor.lockState = CursorLockMode.None;
                   Cursor.visible = true;
                }
           }

    A FixedUpdate() function, after Update():
           void FixedUpdate () {
                 theTimer -= Time.deltaTime; // decrement time,
                                                                 // display time, remove decimal from float:
                 timerText.text = "Time: " + Mathf.Floor(theTimer);
                 if ((theTimer <= 0) && (isEnd == false)){
                      SceneManager.LoadScene ("EndLose");
                     }
           }


    Here is the full revised GameController script:
     GameController.cs:
    using System.Collections;
    using System.Collections.Generic;
    using UnityEngine;
    using UnityEngine.UI;
    using UnityEngine.SceneManagement;

    public class
    GameController : MonoBehaviour {
         public GameObject textGameObject;
         private int score;
         public int scoreWin = 3;

         public float theTimer;
         public Text timerText;
         public float startTime = 20;

         public bool isEnd = true;

         void Start () {
              score =0;
              UpdateScore();
              theTimer = startTime;

              if (isEnd){
                   Cursor.lockState = CursorLockMode.None;
                   Cursor.visible = true;
              }
         }

        void Update () {
               if (Input.GetKey("escape")) {
                     QuitGame();
              }
        }

        void FixedUpdate () {
            theTimer -= Time.deltaTime;
            timerText.text = "Time: " + Mathf.Floor(theTimer);
            if ((theTimer <= 0) && (isEnd == false)){
                SceneManager.LoadScene ("EndLose");
            }
        }

        public void AddScore (int newScoreValue) {
              score += newScoreValue;
              UpdateScore ();
               if (score >= scoreWin) {
                  SceneManager.LoadScene("EndWin");
                }
         }

        void UpdateScore () {
               Text scoreTextB = textGameObject.GetComponent<Text>();
                scoreTextB.text = "Score: " + score;
         }

        public void PlayAgain() {
            SceneManager.LoadScene("GameScene");
            theTimer = startTime;
            score = 0;
        }

        public void QuitGame() {
            #if UNITY_EDITOR
                UnityEditor.EditorApplication.isPlaying = false;
            #else
                Application.Quit();
            #endif
        }
    }
     

    NOTE: FixedUpdate() vs Update():
  • FixedUpdate() runs every .02 seconds on all computers, and is good for timers and physics calculations.
  • Update() runs once per frame and so varies by computer speed; it is good for "listeners" like keyboard inputs.

  •  PART 11: BUILD THE GAME:


    [1] To create a web build to upload to itch.io, please follow the directions here, on the right.


    [2] To create a standalone build:
    a). Open File > Build Settings.

    b). Hit [Build], create a new folder named "Build" at the top level of your Unity project folder (next to "Assets").

    c). Hit [Select Folder] to build game. On Mac this makes a single .APP. On PC this makes multiple files and folder, all needed (when submitting, compress in a .ZIP).

    d). DoubleClick the application in the Build folder to run the game.

    e). Our Update() function in the GameController script lets us hit [Esc] to exit.


    To create a web build to upload to itch.io, follow the directions here, on the right.


    Tutorial by Jason Wiser, MadWomb.com
    The instructional content of this page is © 2015-2023 Jason Wiser.
    See more Unity tutorials at http://www.Madwomb.com/Unity